Create an FTP Account in the Plesk Panel, File Transfer Protocol (FTP) accounts are essential for securely managing and transferring files between your local machine and your web server. Plesk, a popular web hosting control panel, makes it simple to create an FTP Account in the Plesk Panel and manage FTP accounts. Below is a detailed, step-by-step guide tocreate an FTP Account in the Plesk Panel.
Table of Contents
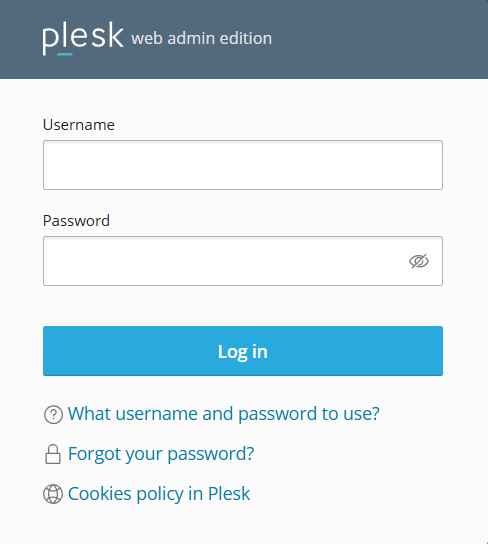
Step 1: Log in to Plesk
The first step in creating an FTP account is accessing your Plesk control panel:
- Open your preferred web browser and navigate to the URL of your Plesk control panel. Typically, this is something like
https://yourdomain.com:8443or a similar address provided by your hosting provider. - Enter your username and password, then click Log In. If you do not have these credentials, contact your hosting provider.
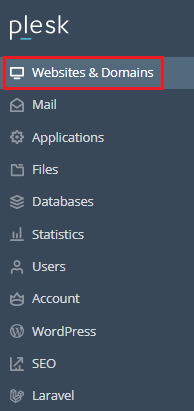
Step 2: Navigate to the Websites & Domains Section
Once logged in, locate the Websites & Domains for which you want to create an FTP Account in the Plesk Panel:
Step 3: Access the FTP Accounts Page
Next, you need to locate the FTP management settings:
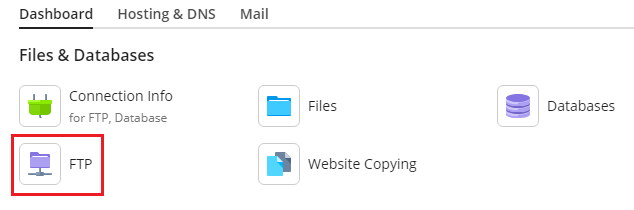
- In the domain’s management section, look for FTP and click on it. If you cannot find it easily, use the search bar at the top of the Plesk interface and type “FTP.” This will help you quickly locate the FTP Access option.
- The FTP Access page will display a list of existing FTP accounts for the selected domain, if any.
Step 4: Create an FTP Account in the Plesk Panel
To create an FTP Account in the Plesk Panel, follow these steps:

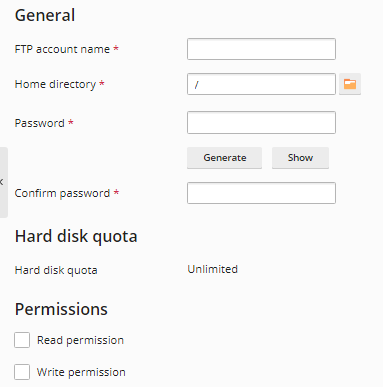
- Click on the Add an FTP Account button.
- Fill in the required fields:
- FTP Account Name: Choose a username for the FTP account. Ensure it’s easy to remember but not guessable for security purposes.
- Home Directory: Specify the directory to which this account will have access. By default, the home directory is set to the root folder of the selected domain. If you want to restrict access to a specific folder (e.g.,
/public_html/images), define it here. - Password: Enter and confirm a strong password for the account. Use a combination of uppercase and lowercase letters, numbers, and special characters to enhance security.
- Permissions: Decide the level of access the FTP account should have. Most users will need both read and write permissions, but you can adjust this based on your needs.
Step 5: Save the FTP Account
Once you have entered all the necessary details:
- Click OK or Save to finalize the creation of the new FTP account.
- The new account will now appear in the list of FTP accounts on the FTP Access page. You can edit or delete it later if needed.

Step 6: Test the FTP Account
After creating the account, it’s a good practice to test it to ensure it works correctly:
- Open an FTP client, such as FileZilla, Cyberduck, or WinSCP.
- Enter the following details into the FTP client:
- Host: Use your domain name (e.g.,
ftp.yourdomain.com) or the server’s IP address. - Username: Enter the FTP account name you just created.
- Password: Use the password you set for the account.
- Port: Typically, the default FTP port is 21. If your server uses a different port, consult your hosting provider.
- Host: Use your domain name (e.g.,
- Connect to the server. Once connected, verify that you can upload and download files to and from the specified home directory.
Create an FTP Account in the Plesk Panel is a straightforward process that involves logging in, navigating to the appropriate domain, and filling out the necessary details. By following the steps outlined above, you can easily set up and manage FTP accounts to streamline file management for your websites. If you encounter any issues, don’t hesitate to contact your hosting provider for assistance or consult the Plesk documentation for troubleshooting tips.