Domain Transfer is the process of moving a domain name from one registrar to another. Here’s a step-by-step breakdown of how the process generally works:
Table of Contents
1. Prepare for Transfer
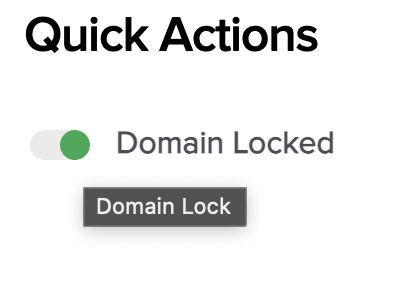
- Unlock the Domain: Domains are typically locked to prevent unauthorized transfers. You need to log in to your current registrar’s account and unlock the domain you want to transfer.
- Verify Contact Information: Ensure that the administrative contact’s email address is up-to-date, as this person will receive important emails about the transfer.
- Get the Authorization Code (EPP Code): Most domain registrars require an authorization code (also called an EPP code) to transfer a domain. This code is a unique identifier for your domain and can be obtained from your current registrar.

2. Initiate the Domain Transfer
- Select a New Registrar: Choose the registrar to which you want to transfer your domain.
- Start the Transfer Process: At the new registrar, initiate the transfer by entering the domain name and the authorization code. You may need to pay a transfer fee, which often includes a one-year renewal of the domain.
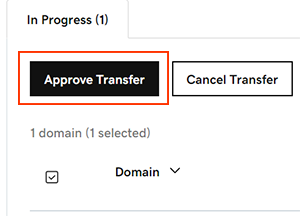
3. Approve the Transfer
- Email Confirmation: Both the current and new registrars will send emails to the administrative contact asking for confirmation of the transfer. You’ll need to approve the transfer for it to proceed.
- Wait for Processing: After approval, the transfer process typically takes 5-7 days. During this time, your website and email services should remain unaffected.
4. Domain Transfer Completion
- Confirmation of Domain Transfer: Once the transfer is complete, you’ll receive a confirmation email from the new registrar. The domain is now under the management of the new registrar.

5. Post-Domain Transfer Actions
- Update DNS Settings: If your DNS settings didn’t transfer over automatically, you’ll need to update them at the new registrar to ensure your website and email services continue to work correctly.
- Renew the Domain: Check the expiration date of your domain after the transfer. Some registrars may add a year to your registration, but it’s always good to verify.
Important Considerations
- 60-Day Rule: ICANN regulations usually require that a domain not be transferred within 60 days of registration or a previous transfer.
- Transfer Lock: If your domain has a transfer lock, it won’t be able to be transferred until the lock is removed.
- Fees: Some registrars charge a fee for transferring domains, but this often includes an extension of your domain registration by one year.
This process may vary slightly depending on the registrars involved, but the steps above cover the general procedure.
When transferring a domain, there are several precautions you should take to ensure a smooth and secure process:
1. Check domain transfer Eligibility
- 60-Day Rule: Ensure that your domain has been registered or transferred for at least 60 days. ICANN policies prevent transfers within this period.
- Domain Status: Verify that the domain is not in a pending delete or redemption status, as these cannot be transferred.
2. Unlock the Domain
- Domain Lock: Make sure to unlock your domain at your current registrar. A locked domain cannot be transferred.
3. Secure the Authorization Code for domain transfer
- Keep it Confidential: The authorization code (EPP code) is critical for the transfer process. Only share it with the new registrar and ensure it’s not exposed to unauthorized parties.
4. Update Contact Information
- Administrative Contact: Ensure that the administrative contact’s email is correct and accessible, as this is where transfer approvals will be sent.
- WHOIS Privacy: Temporarily disable WHOIS privacy protection if enabled, as this can sometimes prevent the transfer process from being initiated properly.
5. Backup DNS Settings
- Save Current Settings: Backup your current DNS settings, including MX records for email and A records for your website. If DNS settings are not transferred automatically, you’ll need to reconfigure them at the new registrar.
6. Choose the Right Time
- Avoid Critical Periods: Avoid initiating a transfer during a critical business period or before an important event to prevent any potential downtime.
- Renewal Consideration: If your domain is close to expiration, renew it before transferring to avoid the risk of it expiring during the transfer process.
7. Monitor Transfer Progress
- Check Email Regularly: Monitor your email for transfer approval requests and updates from both your current and new registrars.
- Track Transfer Status: Log in to both registrars’ accounts to monitor the progress of the transfer and ensure it’s moving forward as expected.
8. Confirm Transfer Completion
- Verify Transfer: After the transfer is complete, log in to your new registrar’s account to confirm that the domain has been successfully transferred.
- Update Payment Information: If your domain registration was set to auto-renew, update your payment details at the new registrar to ensure uninterrupted service.
9. Review Domain Configuration Post-Transfer
- DNS and Website Functionality: After the transfer, double-check that your website, email, and other services associated with the domain are functioning correctly.
- Renewal and Expiration: Confirm the new expiration date of your domain and set reminders for renewal to prevent accidental expiration.
10. Be Aware of Registrar Lock
- Transfer Lock: Some registrars automatically lock transferred domains for a certain period (e.g., 60 days) after the transfer. Be aware of this if you plan to move the domain again soon.
By following these precautions, you can minimize the risk of downtime, security issues, or loss of control over your domain during the transfer process.